- HELP
- Technical Information
- CNC Turning
- Accuracy and Machining Specifications
- Specifiable Dimensional Tolerances
Specifiable Dimensional Tolerances
- When uploading 3D CAD data, you can specify any dimensional tolerances for parts where dimensions and tolerances are not displayed.
- The minimum specifiable tolerance range for tolerances depends on the combination of the part shape.
- Depending on other settings, in-range precision may not be covered by the service.
Fit Tolerances
The fit tolerances that can be set for turning machining and secondary machining are as follows.
| Type of Machining | Fit Tolerances |
|---|---|
| turning | Metal: Grade IT6 or above |
| Resin::Grade IT7 or above | |
| Metal: Grade IT7 or above |
| Resin::Grade IT7 or above |
Caution
- “The following surface treatments cannot be specified with a tolerance range of less than 0.1.”
- Surface Treatment|Trivalent Chromated (clear),Trivalent Chromated (black), Salt Bath Nitriding, Hard Anodized (Clear)
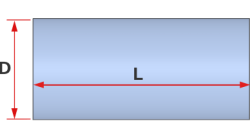
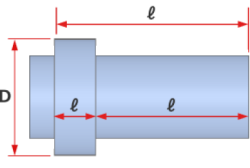
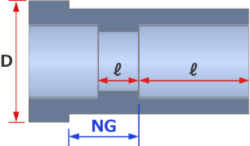
Dimensional Tolerances for Full Length (L) and Length (ℓ)
The following tolerances can be specified for the total length and the length of the individual parts.
[mm]
| Metal | Full Length (L) and Length (ℓ) | |
|---|---|---|
| Example of Minimum Tolerance | Range | |
| L,ℓ ≦ 200 * | ±0.02 | 0.04 |
| 200 <L,ℓ ≦ 500 | ±0.05 | 0.1 |
| 500 < L,ℓ | ±0.2 | 0.4 |
*The range that can be set will change for the following thin plates.
| Metal | Full Length (L) and Length (ℓ) | ||
|---|---|---|---|
| Example of Minimum Tolerance | Range | ||
| L ≦ 5 | 150<D | ±0.1 | 0.2 |
| L<10 | 50 ≦ D | ||
| Resin | Full Length (L) and Length (ℓ) | |
|---|---|---|
| Example of Minimum Tolerance | Range | |
| L,ℓ ≦ 100 | ±0.05 | 0.1 |
| 100< L,ℓ ≦ 200 | ±0.1 | 0.2 |
| 200< L,ℓ ≦ 300 | ±0.2 | 0.4 |
[mm]
| Resin | Full Length (L) and Length (ℓ) | |
|---|---|---|
| min. Tolerance | Range | |
| L,ℓ ≦ 100 | ±0.05 | 0.1 |
| 100 < L, ℓ ≦ 200 | ±0.1 | 0.2 |
| 200 < L, ℓ ≦ 300 | ±0.2 | 0.4 |
| Resin | Full Length (L) and Length (ℓ) | |
|---|---|---|
| Example of Minimum Tolerance | Range | |
| L,ℓ ≦ 100 | ±0.05 | 0.1 |
| 100< L,ℓ ≦ 200 | ±0.1 | 0.2 |
| 200< L,ℓ ≦ 300 | ±0.2 | 0.4 |
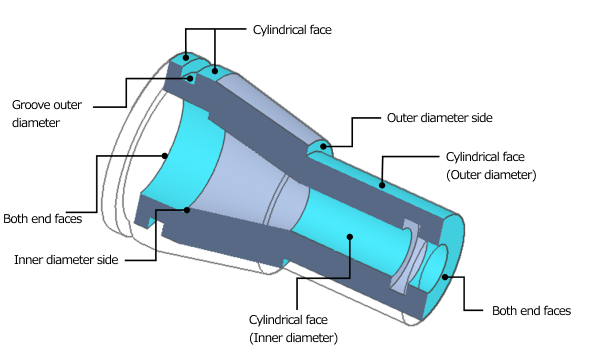
Tolerances for Groove Outer Diameter (D), Groove Width (w) and Position Dimensions (ℓ)
The tolerances that can be set for the outer diameter are as follows.
[mm]
| Tolerances for Groove Outer Diameter (D) | Minimum Tolerance | Range |
|---|---|---|
| Uniform | ±0.02 | 0.04 |
| Groove Width (w) | Minimum Tolerance | Range |
|---|---|---|
| Uniform | ±0.05 | 0.1 |
| Position Dimensions (ℓ) | Minimum Tolerance | Range |
|---|---|---|
| ℓ≦150 | ±0.05 | 0.1 |
| 150<ℓ≦400 | ±0.15 | 0.3 |
| 400<ℓ | ±0.3 | 0.6 |
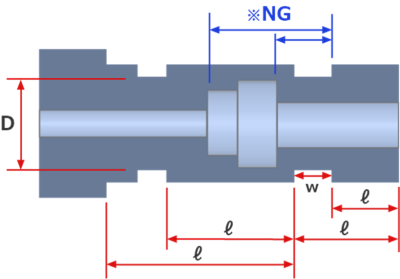
*Tolerance between inner and outer diameter surfaces cannot be added.
Tolerances for Groove Outer Diameter (D), Groove Width (w) and Position Dimensions (ℓ)
The tolerances that can be set for the inner diameter are as follows.
[mm]
| Tolerances for Groove Inner Diameter (d) | Minimum Tolerance | Range |
|---|---|---|
| ±0.05 | 0.1 |
| Groove Width (w) | Minimum Tolerance | Range |
|---|---|---|
| ±0.07 | 0.14 |
| Position Dimensions (ℓ) | Minimum Tolerance | Range |
|---|---|---|
| ±0.1 | 0.2 |
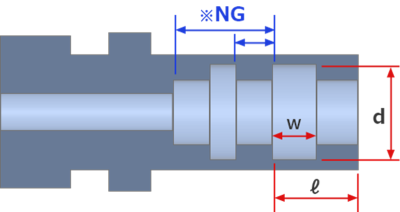
- *Tolerance between internal groove and other elements cannot be added.
- However, position dimensions from the ℓ part end face are excluded.
Tolerances for Each Part
The tolerances that can be set between each shape element are as follows.
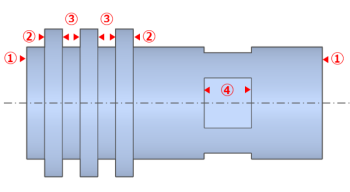
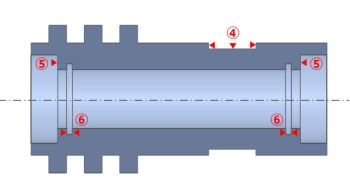
[mm]
| No | Shape Element | (2) Outer Diameter Side/(3)External Groove Side/(4)Pocket Surface | (5) Inner Diameter Bottom | (6) Internal Groove Side |
|---|---|---|---|---|
| (1) | Both End Faces | 0.04~ | 0.04~ | 0.1~ |
| (2) | Outer Diameter Side | |||
| (3) | External Groove Side | – | – | |
| (4) | Pocket Surface | |||
| (5) | Inner Diameter Bottom | – | 0.04~ | |
| (6) | Internal Groove Side | 0.04~ |

[mm]
| No | Shape Element | (5)Precision Hole Centre | (6)Straight Hole Centre/(7)Tapped Hole Centre/(8)Insert Hole Centre/(9)Countersunk Hole Centre | (10)Slotted Hole/Keyway |
|---|---|---|---|---|
| (1) | Center axis | 0.04~ | 0.2~ | – |
| (2) | Both end faces | 0.04~ | ||
| (3) | Outer Diameter Side | |||
| (4) | External Groove Side | – | ||
| (5) | Pocket side face | 0.04~ | ||
| (6) | Pocket bottom face | – | ||
| (7) | Precision Hole Centre | 0.2~ | 0.04~ | |
| (8) | Straight Hole Centre | 0.2~ | 0.2~ | |
| (9) | Tapped Hole Centre | |||
| (10) | Insert Hole Centre | |||
| (11) | Countersunk Hole Centre | |||
| (12) | Slotted Hole/Keyway | 0.04~ | 0.04~ |
Tip
-
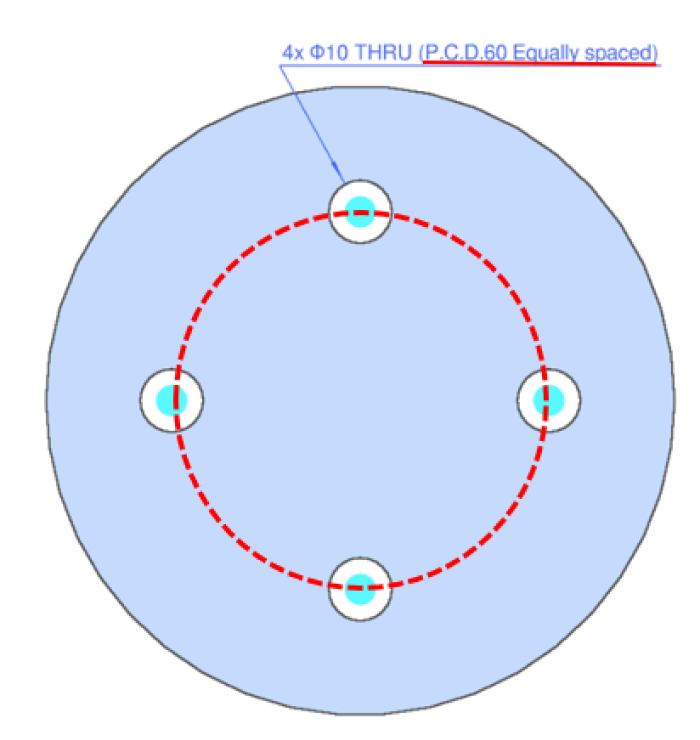
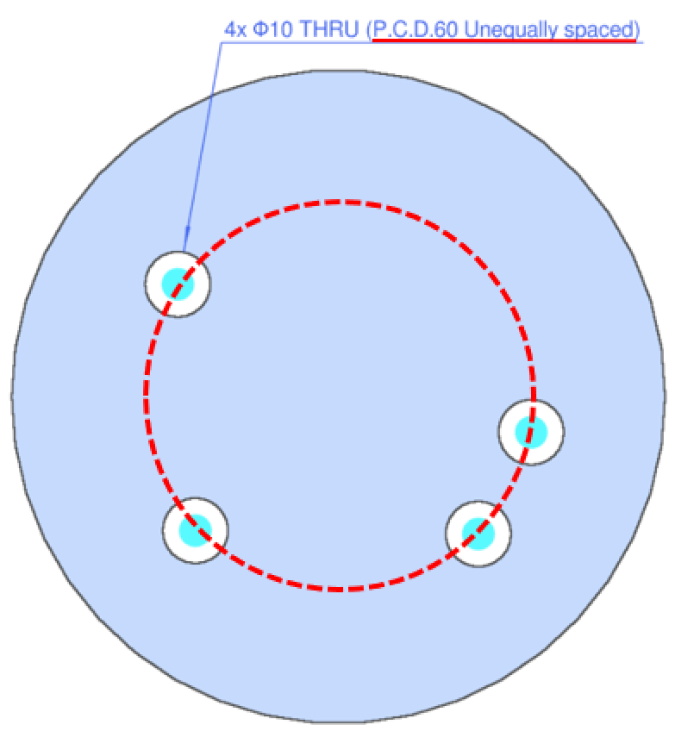
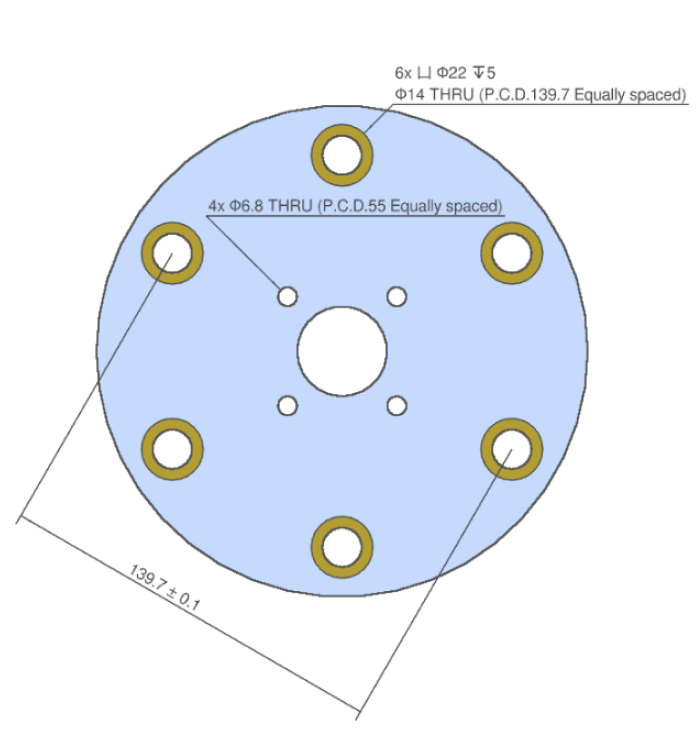
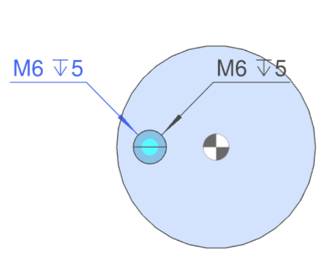
- (1) Holes on the same circumference are called P.C.D. (Pitch Circle Diameter). Cross bores are not supported.
- (2) P.C.D is recognized even with different hole types.
- (3) P.C.D. is recognised regardless of whether the positions of the holes are equally or unequally divided.
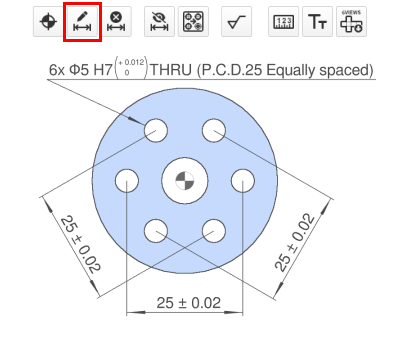
- (4) It is possible to add diagonal dimensions that indicate the distance between the holes and the P.C.D.
| P.C.D. Equally divided | P.C.D. Unequally divided | The distance between P.C.D. holes. |
 |
 |
 |
Caution
- The P.C.D. recognition is an additional and reference information in meviy for turning parts.
- If you need to specify the tolerance between holes, please select the “Add tolerance” icon and specify the tolerance for the target position.
Tip
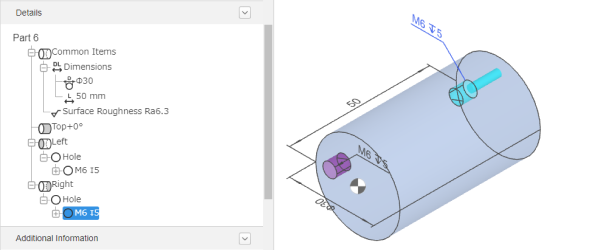
- The positional relationship of holes on both end faces of the reference model in the figure below is a general tolerance.
 |
 |
Notes
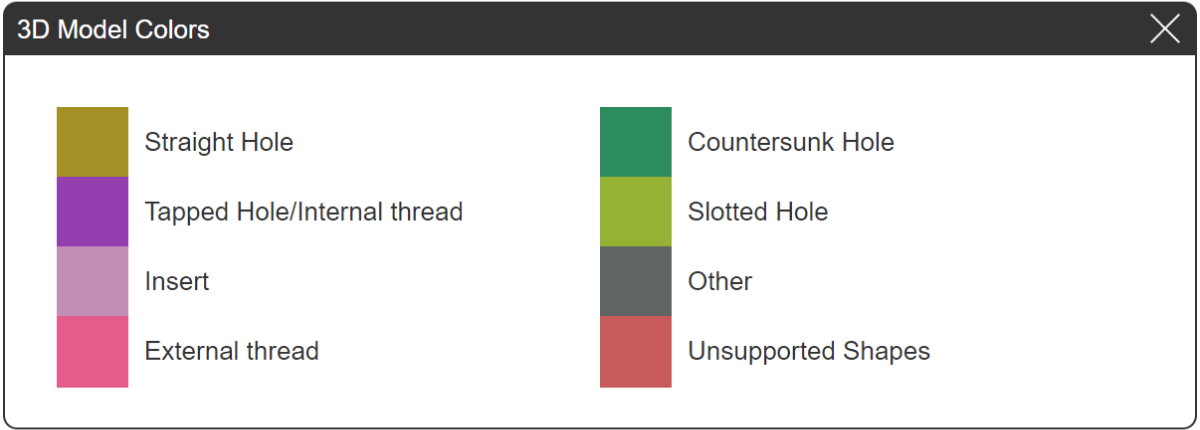
- 3D Model Color Schemes
- If a colour scheme for an unsupported shape is displayed, automatic quotation is not available.
Geometric Tolerance
Possible geometric tolerance setting conditions are as follows.
configurable plane
- Holes, keyways (inner diameter/outer diameter), notches (including pockets), inner diameter grooves, and end grooves cannot be specified.
- If a datum or geometric tolerance is specified for the threaded part, we guarantee it based on the measured value before threading.
Configurable geometric tolerances
*Depending on the material and size, the estimate may be provided by the person in charge.
| Geometric Tolerance Type | Symbol | Plane | Cylindrical surface | Datum | Datum target area | Tolerance value |
|---|---|---|---|---|---|---|
| Flatness | 〇 | – | – | surface | 0.01~0.1 | |
| Parallelism | 〇 | – | necessary | surface | 0.01~0.1 | |
| Perpendicularity | 〇 | 〇 | necessary | surface | 0.01~0.1 | |
| Circularity | – | 〇 | – | surface | 0.01~0.1 | |
| Concentricity | – | 〇 | necessary | axis line | 0.01~0.1 | |
| Straightness | – | 〇 | – | surface | 0.01~0.1 | |
| Cylindricity | – | 〇 | – | surface | 0.01~0.1 | |
| Circular rount | – | 〇 | necessary | axis line | 0.01~0.1 | |
| Total runou | – | 〇 | necessary | axis line | 0.01~0.1 |
Compatibility table (material, surface treatment, heat treatment)
| Material | availability |
|---|
| Steel | EN 1.1191 equiv. | 〇 |
|---|---|---|
| EN 1.0038 equiv. | 〇 | |
| EN 1.7220 equiv. | 〇 | |
| EN 1.7225 equiv. | 〇 | |
| EN 1.2510 equiv. | 〇 | |
| EN 1.2379 equiv. | 〇 | |
| EN 1.2344 equiv | 〇 | |
| EN 1.3505 equiv. | 〇 | |
| Stainless Steel | EN 1.4305 equiv. | 〇 |
| EN 1.4301 equiv. | 〇 | |
| EN 1.4401 equiv. | 〇 | |
| EN 1.4125 equiv. | 〇 | |
| Aluminum | EN AW−2017 equiv. | 〇 |
| EN AW−5056 equiv. | 〇 | |
| EN AW−6061 equiv. | 〇 | |
| EN AW−7075 equiv. | 〇 | |
| Copper | EN CW614N equiv. | 〇 |
| Resin | POM (Acetal, Standard, white) | ー |
| POM (Acetal, Standard, black) | ー | |
| MC Nylon (Standard, blue) | ー | |
| MC Nylon (Weather resistance, black ash) | ー | |
| ABS (Standard, natural color) | ー | |
| ABS (Standard, black) | ー | |
| PEEK (Standard, grey-brown) | ー | |
| PPS (Standard, natural color) | ー | |
| Acrylic (Standard, transparent) | ー | |
| PC (Standard, transparent) | ー | |
| PC (Standard, black) | ー | |
| PP (Standard, natural color) | ー | |
| PVC (Standard, grey) | ー | |
| UHMWPE (Standard, white) | ー | |
| Flour (PTFE, Standard, white) | ー |
Compatibility table (surface treatment)
| Surface Treatment | availability |
|---|
| Steel | Electroless nickel | 〇 |
|---|---|---|
| Hard chrome plating (Flash Plating) | 〇 | |
| Black oxide | 〇 | |
| Trivalent chromate (Clear) | × | |
| Trivalent chromate (Black) | × | |
| Salt bath nitriding | 〇 | |
| LTBC- surface treatment | × | |
| Phosphating (Manganese) | 〇 | |
| Stainless Steel | ー | |
| Aluminum | Clear anodize | 〇 |
| Black anodize | 〇 | |
| Black anodize (Matt) | 〇 | |
| Hard anodize (Clear) | × | |
| Copper | ー | |
| Resin | ー | |
- *Resin conforms to [Geometric Tolerance Accuracy Standards for Lathe Machining] >>> Normal tolerance standard for machining dimensions without instructions
- *Hard chrome (flash) and isonite may be ground after surface treatment depending on the precision, in which case no film will remain on the processed area.