- HELP
- Technical Information
- CNC Turning
- Accuracy and Machining Specifications
- Specifications for External Thread and Internal Thread, Keyways, Holes and Pockets
Specifications for External Thread and Internal Thread, Keyways, Holes and Pockets
External Thread and Internal Thread (mm)
The list of supported external and internal threads is as follows.
Caution
Threads that are not listed in the specification table are not supported.
Caution
- The automatic hole type recognition function is not supported for the inner diameter in round object machining. Configure the settings on 3D Viewer.
- For differences between inner diameters and holes, please click here.→Design Guidelines>Turning Parts Recognition Conditions>Outer- and Inner Diameter Recognition Conditions
| 〇 | External Thread and Internal Thread are available for Automatic quotation |
|---|---|
| ⚫️ | Tapped holes machined by MC are available for automatic quotation |
| △ |
|
| ✖ | Cannot be machined |
- *Internal thread: thread made on a lathe in the central axis
- *Tapped Hole: Threads machined by MC not on the center axis
- →Design Guidelines>Turning Parts Recognition Conditions>Outer- and Inner Diameter Recognition Conditions
| Nominal Diameter | Model Diameter (ø) mm | Pitch1 | External Thread | Internal Thread・Tapped Holes | Pitch2 | External Thread | Internal Thread・Tapped Holes | Pitch3 | External Thread | Internal Thread・Tapped Holes | Pitch4 | External Thread | Internal Thread・Tapped Holes | Pitch5 | External Thread | Internal Thread・Tapped Holes | |||||||||||
|---|---|---|---|---|---|---|---|---|---|---|---|---|---|---|---|---|---|---|---|---|---|---|---|---|---|---|---|
| External Thread | Internal Thread | Right-Hand Thread | Left-Hand Thread | Right-Hand Thread | Left-Hand Thread | Right-Hand Thread | Left-Hand Thread | Right-Hand Thread | Left-Hand Thread | Right-Hand Thread | Left-Hand Thread | Right-Hand Thread | Left-Hand Thread | Right-Hand Thread | Left-Hand Thread | Right-Hand Thread | Left-Hand Thread | Right-Hand Thread | Left-Hand Thread | Right-Hand Thread | Left-Hand Thread | ||||||
| M2 | 1.7~2 | 1.5~2 | 0.4 | 〇 | 〇 | 〇⚫️ | 〇 | 0.25 | 〇 | △ | 〇⚫️ | △ | |||||||||||||||
|---|---|---|---|---|---|---|---|---|---|---|---|---|---|---|---|---|---|---|---|---|---|---|---|---|---|---|---|
| M2.2 | 1.7~2.2 | 1.7~2.2 | 0.45 | 〇 | △ | 〇⚫️ | ✖ | 0.25 | 〇 | △ | 〇⚫️ | ✖ | |||||||||||||||
| M2.5 | 2.2~2.5 | 2~2.5 | 0.45 | 〇 | 〇 | 〇⚫️ | ✖ | 0.35 | 〇 | △ | 〇⚫️ | ✖ | |||||||||||||||
| M3 | 2.6~3 | 2.4~3 | 0.5 | 〇 | 〇 | 〇⚫️ | 〇 | 0.35 | 〇 | △ | 〇⚫️ | △ | |||||||||||||||
| M3.5 | 3.1~3.5 | 2.8~3.5 | 0.6 | 〇 | △ | 〇⚫️ | △ | 0.35 | 〇 | △ | 〇⚫️ | △ | |||||||||||||||
| M4 | 3.5~4 | 3.2~4 | 0.7 | 〇 | 〇 | 〇⚫️ | 〇 | 0.5 | 〇 | △ | 〇⚫️ | △ | |||||||||||||||
| M4.5 | 4~4.5 | 3.6~4.5 | 0.75 | 〇 | △ | 〇⚫️ | △ | 0.5 | 〇 | △ | 〇⚫️ | △ | |||||||||||||||
| M5 | 4.4~5 | 4.1~5 | 0.8 | 〇 | 〇 | 〇⚫️ | 〇 | 0.5 | 〇 | △ | 〇⚫️ | △ | |||||||||||||||
| M5.5 | 5.1~5.5 | 4.9~5.5 | 0.5 | 〇 | △ | 〇⚫️ | △ | ||||||||||||||||||||
| M6 | 5.3~6 | 4.9~6 | 1.0 | 〇 | 〇 | 〇⚫️ | 〇 | 0.75 | 〇 | 〇 | 〇⚫️ | 〇 | |||||||||||||||
| M7 | 6.3~7 | 5.9~7 | 1.0 | 〇 | △ | 〇⚫️ | △ | 0.75 | 〇 | △ | 〇⚫️ | ✖ | |||||||||||||||
| M8 | 7.1~8 | 6.6~8 | 1.25 | 〇 | 〇 | 〇⚫️ | 〇 | 1.0 | 〇 | 〇 | 〇⚫️ | 〇 | 0.75 | 〇 | △ | 〇⚫️ | △ | ||||||||||
| M9 | 8.1~9 | 7.6~9 | 1.25 | 〇 | △ | 〇⚫️ | △ | 1.0 | 〇 | △ | 〇⚫️ | △ | 0.75 | 〇 | △ | 〇⚫️ | ✖ | ||||||||||
| M10 | 9~10 | 8.3~10 | 1.5 | 〇 | 〇 | 〇⚫️ | 〇 | 1.25 | 〇 | △ | 〇⚫️ | 〇 | 1.0 | 〇 | △ | 〇⚫️ | 〇 | 0.75 | 〇 | △ | 〇⚫️ | △ | |||||
| M11 | 10~11 | 9.3~11 | 1.5 | 〇 | △ | 〇⚫️ | △ | 1.0 | 〇 | △ | 〇⚫️ | ✖ | 0.75 | 〇 | △ | 〇⚫️ | ✖ | ||||||||||
| M12 | 10.8~12 | 10.1~12 | 1.75 | 〇 | 〇 | 〇⚫️ | 〇 | 1.5 | 〇 | 〇 | 〇⚫️ | △ | 1.25 | 〇 | 〇 | 〇⚫️ | 〇 | 1.0 | 〇 | △ | 〇⚫️ | 〇 | |||||
| M14 | 12.7~14 | 11.8~14 | 2.0 | 〇 | 〇 | 〇⚫️ | 〇 | 1.5 | 〇 | 〇 | 〇⚫️ | 〇 | 1.25 | 〇 | △ | 〇⚫️ | △ | 1.0 | 〇 | △ | 〇⚫️ | △ | |||||
| M15 | 14~15 | 13.3~15 | 1.5 | 〇 | △ | 〇⚫️ | △ | 1.0 | 〇 | △ | 〇⚫️ | △ | |||||||||||||||
| M16 | 14.7~16 | 13.8~16 | 2.0 | 〇 | 〇 | 〇⚫️ | 〇 | 1.5 | 〇 | 〇 | 〇⚫️ | 〇 | 1.0 | 〇 | △ | 〇⚫️ | △ | ||||||||||
| M17 | 16~17 | 15.3~17 | 1.5 | 〇 | △ | 〇⚫️ | △ | 1.0 | 〇 | △ | 〇⚫️ | △ | |||||||||||||||
| M18 | 16.3~18 | 15.2~18 | 2.5 | 〇 | 〇 | 〇⚫️ | 〇 | 2.0 | 〇 | △ | 〇⚫️ | △ | 1.5 | 〇 | 〇 | 〇⚫️ | 〇 | 1.0 | △ | △ | 〇⚫️ | △ | |||||
| M20 | 18.3~20 | 17.2~20 | 2.5 | 〇 | 〇 | 〇⚫️ | 〇 | 2.0 | 〇 | △ | 〇⚫️ | △ | 1.5 | 〇 | 〇 | 〇⚫️ | 〇 | 1.0 | 〇 | △ | 〇⚫️ | △ | |||||
| Nominal Diameter | Model Diameter (ø) mm | Pitch1 | External Thread | Internal Thread | Pitch2 | External Thread | Internal Thread | Pitch3 | External Thread | Internal Thread | Pitch4 | External Thread | Internal Thread | Pitch5 | External Thread | Internal Thread | |||||||||||
|---|---|---|---|---|---|---|---|---|---|---|---|---|---|---|---|---|---|---|---|---|---|---|---|---|---|---|---|
| External Thread | Internal Thread | Right-Hand Thread | Left-Hand Thread | Right-Hand Thread | Left-Hand Thread | Right-Hand Thread | Left-Hand Thread | Right-Hand Thread | Left-Hand Thread | Right-Hand Thread | Left-Hand Thread | Right-Hand Thread | Left-Hand Thread | Right-Hand Thread | Left-Hand Thread | Right-Hand Thread | Left-Hand Thread | Right-Hand Thread | Left-Hand Thread | Right-Hand Thread | Left-Hand Thread | ||||||
| M22 | 20.3~22 | 19.2~22 | 2.5 | 〇 | 〇 | 〇 | 〇 | 2.0 | 〇 | △ | 〇 | △ | 1.5 | 〇 | 〇 | 〇 | 〇 | 1.0 | 〇 | △ | 〇 | △ | |||||
|---|---|---|---|---|---|---|---|---|---|---|---|---|---|---|---|---|---|---|---|---|---|---|---|---|---|---|---|
| M24 | 22~24 | 20.7~24 | 3.0 | 〇 | 〇 | 〇 | 〇 | 2.0 | 〇 | 〇 | 〇 | △ | 1.5 | 〇 | 〇 | 〇 | 〇 | 1.0 | 〇 | △ | 〇 | △ | |||||
| M25 | 23.7~25 | 22.8~25 | 2.0 | 〇 | △ | 〇 | △ | 1.5 | 〇 | △ | 〇 | △ | 1.0 | 〇 | 〇 | 〇 | △ | ||||||||||
| M26 | 25~26 | 24.3~26 | 1.5 | 〇 | △ | 〇 | △ | ||||||||||||||||||||
| M27 | 25~27 | 23.7~27 | 3.0 | 〇 | 〇 | 〇 | 〇 | 2.0 | 〇 | 〇 | 〇 | △ | 1.5 | 〇 | 〇 | 〇 | △ | 1.0 | 〇 | △ | 〇 | △ | |||||
| M28 | 26.7~28 | 25.8~28 | 2.0 | 〇 | △ | 〇 | △ | 1.5 | 〇 | △ | 〇 | △ | 1.0 | 〇 | △ | 〇 | △ | ||||||||||
| M30 | 27.7~30 | 26.2~30 | 3.5 | 〇 | 〇 | 〇 | 〇 | 3.0 | 〇 | △ | 〇 | △ | 2.0 | 〇 | 〇 | 〇 | △ | 1.5 | 〇 | 〇 | 〇 | 〇 | 1.0 | 〇 | △ | 〇 | △ |
| M32 | 30.7~32 | 29.8~32 | 2.0 | 〇 | △ | 〇 | △ | 1.5 | 〇 | △ | 〇 | △ | |||||||||||||||
| M33 | 30.7~33 | 29.2~33 | 3.5 | 〇 | 〇 | 〇 | 〇 | 3.0 | 〇 | △ | △ | △ | 2.0 | 〇 | 〇 | 〇 | △ | 1.5 | 〇 | △ | 〇 | △ | |||||
| M35 | 34~35 | 33.3~35 | 1.5 | 〇 | △ | 〇 | △ | ||||||||||||||||||||
| M36 | 33.4~36 | 31.6~36 | 4.0 | 〇 | 〇 | 〇 | 〇 | 3.0 | 〇 | △ | 〇 | △ | 2.0 | 〇 | 〇 | 〇 | 〇 | 1.5 | 〇 | △ | 〇 | △ | |||||
| M38 | 37~38 | 36.3~38 | 1.5 | 〇 | △ | 〇 | △ | ||||||||||||||||||||
| M39 | 36.4~39 | 34.6~39 | 4.0 | 〇 | 〇 | 〇 | 〇 | 3.0 | 〇 | △ | 〇 | △ | 2.0 | 〇 | △ | 〇 | △ | 1.5 | △ | 〇 | △ | △ | |||||
| M40 | 38~40 | 36.7~40 | 3.0 | 〇 | △ | △ | 〇 | 2.0 | 〇 | △ | 〇 | △ | 1.5 | 〇 | △ | 〇 | △ | ||||||||||
| M42 | 39~42 | 37.1~42 | 4.5 | 〇 | 〇 | 〇 | 〇 | 4.0 | 〇 | △ | △ | △ | 3.0 | 〇 | 〇 | 〇 | △ | 2.0 | 〇 | △ | 〇 | △ | 1.5 | △ | △ | 〇 | △ |
| M45 | 42~45 | 40.1~45 | 4.5 | 〇 | △ | 〇 | 〇 | 4.0 | △ | △ | △ | △ | 3.0 | 〇 | △ | 〇 | △ | 2.0 | 〇 | △ | 〇 | △ | 1.5 | 〇 | △ | 〇 | △ |
| M48 | 44.7~48 | 42.5~48 | 5.0 | 〇 | 〇 | 〇 | 〇 | 4.0 | △ | △ | △ | △ | 3.0 | 〇 | △ | 〇 | △ | 2.0 | 〇 | 〇 | 〇 | △ | 1.5 | 〇 | △ | 〇 | △ |
| M50 | 48~50 | 46.7~50 | 3.0 | △ | △ | △ | △ | 2.0 | △ | △ | △ | △ | 1.5 | △ | △ | 〇 | △ | ||||||||||
Notes
The automatic hole type recognition function is supported in the same way as for edged object machining.External Thread and Internal Thread (inch)
The list of supported external and internal threads is as follows.
Inch threads are only compatible with right-hand threads.
Inch threads are only compatible with right-hand threads.
| ◯ | External Thread and Internal Thread are available for Automatic quotation |
|---|---|
| ⚫️ | Tapped holes machined by MC are available for automatic quotation |
| △ |
|
| ✖ | Cannot be machined |
| Nominal Diameter | Model Diameter (ø) mm | Thread Type | External Thread | Internal Thread | ||
|---|---|---|---|---|---|---|
| External Thread / Internal Thread | Right-Hand Thread | Left-Hand Thread | Right-Hand Thread | Left-Hand Thread | ||
| #2-56 | 1.96~2.19 | UNC | ◯ | ✖ | ◯⚫️ | ✖ |
|---|---|---|---|---|---|---|
| #2-64 | 1.75~2.19 | UNF | ◯ | ✖ | ◯⚫️ | ✖ |
| #3-48 | 1.94~2.52 | UNC | ◯ | ✖ | ◯⚫️ | ✖ |
| #3-56 | 2.02~2.52 | UNF | ◯ | ✖ | ◯⚫️ | ✖ |
| #4-40 | 2.15~2.85 | UNC | ◯ | ✖ | ◯⚫️ | ✖ |
| #4-48 | 2.12~2.85 | UNF | ◯ | ✖ | ◯⚫️ | ✖ |
| #5-40 | 2.48~3.18 | UNC | ◯ | ✖ | ◯⚫️ | ✖ |
| #5-44 | 2.55~3.18 | UNF | ◯ | ✖ | ◯⚫️ | ✖ |
| #6-32 | 2.64~3.51 | UNC | ◯ | ✖ | ◯⚫️ | ✖ |
| #6-40 | 2.81~3.51 | UNF | ◯ | ✖ | ◯⚫️ | ✖ |
| #8-32 | 3.3~4.17 | UNC | ◯ | ✖ | ◯⚫️ | ✖ |
| #8-36 | 3.4~4.17 | UNF | ◯ | ✖ | ◯⚫️ | ✖ |
| #10-24 | 3.68~4.83 | UNC | ◯ | ✖ | ◯⚫️ | ✖ |
| #10-32 | 3.96~4.83 | UNF | ◯ | ✖ | ◯⚫️ | ✖ |
| #12-24 | 4.34~5.49 | UNC | ◯ | ✖ | ◯⚫️ | ✖ |
| #12-28 | 4.49~5.49 | UNF | ◯ | ✖ | ◯⚫️ | ✖ |
| 1/4-20 | 4.97~6.35 | UNC | ◯ | ✖ | ◯⚫️ | ✖ |
| 1/4-28 | 5.35~6.35 | UNF | ◯ | ✖ | ◯⚫️ | ✖ |
| 5/16-18 | 6.4~7.94 | UNC | ◯ | ✖ | ◯⚫️ | ✖ |
| 5/16-24 | 6.78~7.94 | UNF | ◯ | ✖ | ◯⚫️ | ✖ |
| 3/8-16 | 7.79~9.53 | UNC | ◯ | ✖ | ◯⚫️ | ✖ |
| 3/8-24 | 8.37~9.53 | UNF | ◯ | ✖ | ◯⚫️ | ✖ |
| 7/16-14 | 9.14~11.12 | UNC | ◯ | ✖ | ◯⚫️ | ✖ |
| 7/16-20 | 9.72~11.12 | UNF | ◯ | ✖ | ◯⚫️ | ✖ |
| 1/2-13 | 10.58~12.7 | UNC | ◯ | ✖ | ◯⚫️ | ✖ |
| 1/2-20 | 11.32~12.7 | UNF | ◯ | ✖ | ◯⚫️ | ✖ |
| 9/16-12 | 11.98~14.29 | UNC | ◯ | ✖ | ◯⚫️ | ✖ |
| 9/16-18 | 12.75~14.29 | UNF | ◯ | ✖ | ◯⚫️ | ✖ |
| 5/8-11 | 13.37~15.88 | UNC | ◯ | ✖ | ◯⚫️ | ✖ |
| 5/8ー18 | 14.27~15.88 | UNF | ◯ | ✖ | ◯⚫️ | ✖ |
| 3/4-10 | 16.29~19.05 | UNC | ◯ | ✖ | ◯ | ✖ |
| 3/4-16 | 17.32~19.05 | UNF | ◯ | ✖ | ◯ | ✖ |
| 1-8 | 21.96~25.4 | UNC | ◯ | ✖ | ◯ | ✖ |
| 1-12 | 23.11~25.4 | UNF | ◯ | ✖ | ◯ | ✖ |
Tapered External Thread and Internal Thread (ISO)
- The following is a list of available tapered pipe thread sizes.
- G (parallel pipe thread), Rp (parallel internal tapered pipe thread), etc. are not available.
| ◯ | automatic quoting available |
|---|---|
| ✖ | Cannot be machined(Manual quotation) |
| Nominal diameter | Model Diameter | ISO Standard Effective Length | External Thread | Nominal diameter | Model Diameter | ISO Standard Effective Depth | Internal Thread | |
|---|---|---|---|---|---|---|---|---|
| With incomplete threads | Only with complete threads | |||||||
| R1/16 | 5.44~8.01 | 6.4 | 〇 | Rc1/16 | 5.44~8.07 | 6.2 | 4.40 | 〇 |
| R1/8 | 8.02~10.42 | 6.4 | 〇 | Rc 1/8 | 8.08~10.49 | 6.2 | 4.4 | 〇 |
| R1/4 | 10.43~13.85 | 9.7 | 〇 | Rc 1/4 | 10.5~13.97 | 9.4 | 6.7 | 〇 |
| R3/8 | 13.86~17.41 | 10.0 | 〇 | Rc 3/8 | 13.98~17.52 | 9.7 | 7.0 | 〇 |
| R1/2 | 17.42~21.70 | 13.1 | 〇 | Rc 1/2 | 17.53~21.96 | 12.7 | 9.1 | 〇 |
| R3/4 | 22.82~27.14 | 14.5 | 〇 | Rc 3/4 | 22.97~27.44 | 14.1 | 10.2 | 〇 |
| R1 | 28.97~33.92 | 16.7 | 〇 | Rc 1 | 29~34.25 | 16.2 | 11.6 | 〇 |
| R11/4 | 37.56~42.51 | 19.1 | 〇 | Rc 11/4 | 37.81~42.91 | 18.5 | 13.4 | 〇 |
| R11/2 | 43.45~48.41 | 19.1 | 〇 | Rc 11/2 | 43.7~48.8 | 18.5 | 13.4 | 〇 |
| R2 | 55.16~60.12 | 23.3 | × | Rc 2 | 55.66~60.61 | 22.8 | 16.9 | × |
| R2 1/2 | 70.68~75.64 | 26.6 | × | Rc 2 1/2 | 71.23~76.18 | 26.7 | 18.6 | × |
| R3 | 83.28~88.24 | 29.8 | × | Rc 3 | 83.93~89.1 | 29.8 | 21.1 | × |
| R4 | 107.08~112.04 | 35.8 | × | Rc4 | 109.15~114.63 | 35.8 | 25.9 | × |
| R5 | 132.21~137.17 | 40.0 | × | Rc 5 | 134.47~140.5 | 40.1 | 29.3 | × |
| R6 | 157.61~162.57 | 40.0 | × | Rc 6 | 159.87~166.0 | 40.1 | 29.3 | × |
Tip
Thread length is automatically quoted using ISO standard lengths. Tapered pipe threads must pass a gauge inspection before the product is shipped.
Please request a Manual Quotation if a length other than the standard is required.
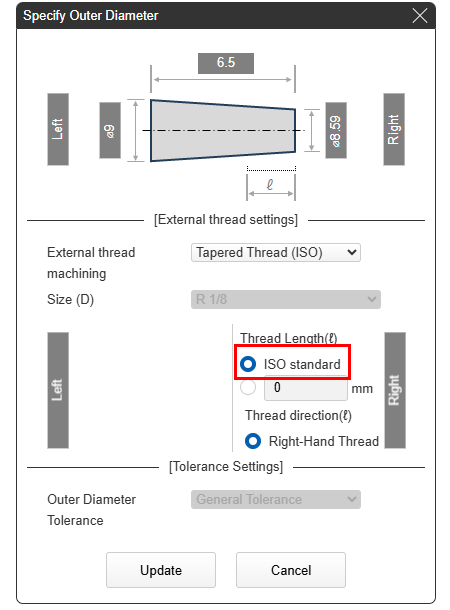
Caution
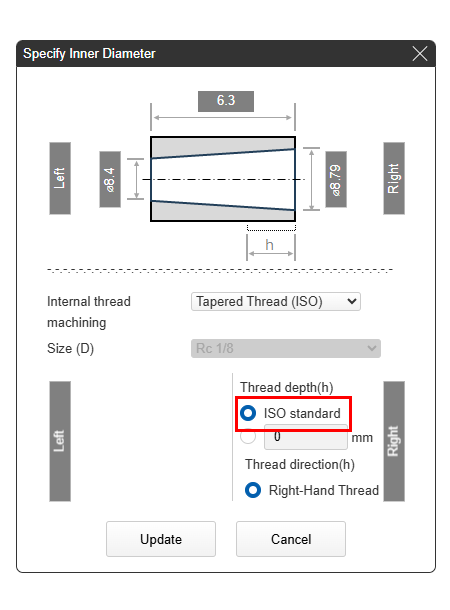
Model the taper into the part. The angle for tapered pipe threads can be specified between 0° and 2.5° with respect to the center axis.

Caution
The diameter of the taper in the model is determined as shown in the figure below for external and internal threads. The diameter sizes recognized by meviy follow ISO standards.

Insert Holes
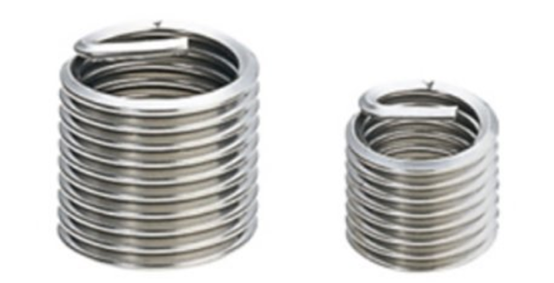
- When the quoted material is aluminum・Resin in Settings for Insert Holes, the insert can be selected using the logic equivalent to that used for inner diameter internal thread recognition for round object machining.
- The insert material is 1.4301 Stainless Steel.
- There are four nominal lengths for each diameter: 0.5D, 1D, 1.5D and 2D.
- Inch threads are not compatible.
Material of insert : EN 1.4301 equiv.
[mm]
| Insert | Pitch |
|---|---|
| Nominal Diameter | |
| M2 | 0.4 |
| M2.5 | 0.45 |
| M3 | 0.5 |
| M4 | 0.7 |
| M5 | 0.8 |
| M6 | 1.0 |
| M8 | 1.25 |
| M10 | 1.5 |
| M12 | 1.75 |
Keyways
- For keyways that match the JIS (B 1301:1996), tolerances are automatically set and can be changed in the dialog.
- *The default settings can be customised in user settings.
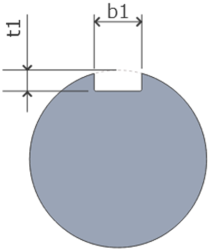
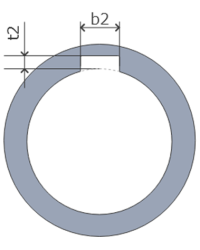
[mm]
|
b1 and b2
Key Dimensions |
b1 Tolerance | b2 Tolerance | t1 Key Dimensions | t1 Tolerance | t2 Key Dimensions | t2 Tolerance | ||||
|---|---|---|---|---|---|---|---|---|---|---|
| P9 | N9 | H9 | P9 | Js9 | D10 | |||||
| 2 |
|
|
|
|
±0.0125 |
|
1.2 |
|
1.0 |
|
| 3 | 1.8 | 1.4 | ||||||||
| 4 |
|
|
|
|
±0.0150 |
|
2.5 | 1.8 | ||
| 5 | 3.0 | 2.3 | ||||||||
| 6 | 3.5 | 2.8 | ||||||||
| 8 |
|
|
|
|
±0.0180 |
|
4.0 |
|
3.3 |
|
| 10 | 5.0 | |||||||||
| 12 |
|
|
|
|
±0.0215 |
|
||||
| 14 | 5.5 | 3.8 | ||||||||
| 16 | 6.0 | 4.3 | ||||||||
| 18 | 7.0 | 4.4 | ||||||||
| 20 |
|
|
|
|
±0.0260 |
|
7.5 | 4.9 | ||
| 22 | 9.0 | 5.4 | ||||||||
| 25 | ||||||||||
| 28 | 10 | 6.4 | ||||||||
| 32 |
|
|
|
-0.026 -0.088 | ±0.0310 |
|
11 | 7.4 | ||
Precision Holes
- Precision holes are straight holes with either a fit tolerance, a bidirectional tolerance, or a unidirectional tolerance selected for the hole diameter tolerance.
- The accuracy and effective depth for the diameter can be specified with precision holes.
Accuracy ranges supported for automatic quotation
[mm]
| Diameter | Accuracy Range | |||
|---|---|---|---|---|
| > | ≤ | Fit Tolerance | Bidirectional Tolerance< Minimum Value | Unidirectional Tolerance Minimum Value (Range) |
| 2.999 | 3 | Grade IT7 or higher | 0.005 | 0.01 |
| 3 | 6 | 0.006 | 0.012 | |
| 6 | 10 | 0.008 | 0.015 | |
| 10 | 18 | 0.009 | 0.018 | |
| 18 | 30 | 0.011 | 0.021 | |
| 30 | 50 | 0.013 | 0.025 | |
| 50 | 80 | 0.015 | 0.03 | |
| 80 | 120 | 0.018 | 0.035 | |
| 120 | 180 | 0.02 | 0.04 | |
| 180 | 250 | 0.023 | 0.046 | |
| 250 | 315 | 0.026 | 0.052 | |
| 315 | 400 | 0.029 | 0.057 | |
| 400 | 500 | 0.032 | 0.063 | |
Countersunk Holes
Holes with the following shapes on the right and left end faces are recognised as countersunk holes.
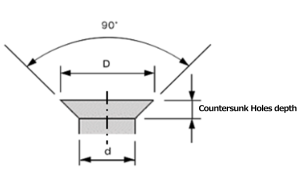
- *Countersunk hole shapes modelled on the cylinder side are not recognised as countersunk holes.
- ・ Countersunk (on a conical shape) angle is 90°
- ・ d is 3.0 mm or more
- ・D/d: When d ≧ 4.0 mm, D > 1.4 d
- When d < 4.0 mm, D > 1.7 d
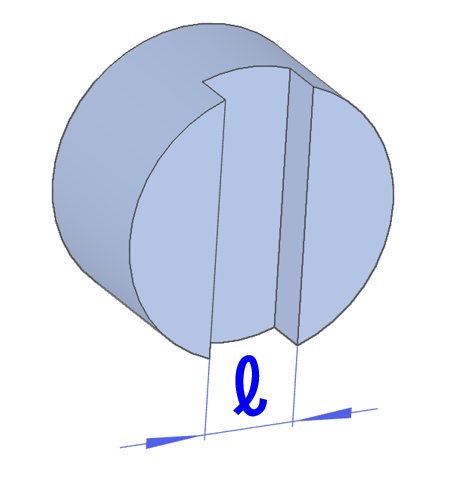
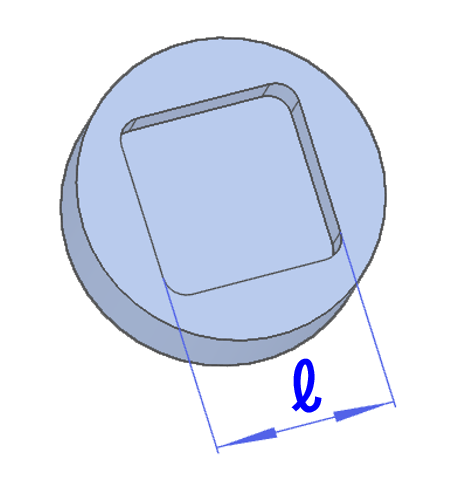
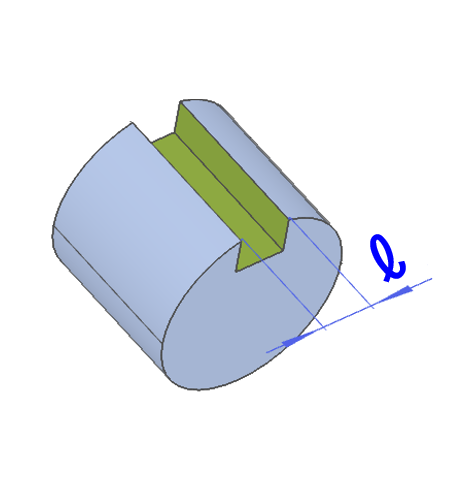
Pockets and Slotted Holes
Compatible range of pockets and slotted holes
| Shape type | No tolerance | Tolerance range | |
|---|---|---|---|
| 0.1~(±0.05~) | 0.04~(±0.02~) | ||
|
ℓ ≥ 0.5mm | ℓ ≥ 0.5mm | ー |
|
ℓ ≥ 2mm | ℓ ≥ 2mm | ℓ ≥ 2mm |
|
ℓ ≥ 2mm | ℓ ≥ 2mm | ℓ ≥ 3mm |
Retaining ring
Required groove width for retaining rings
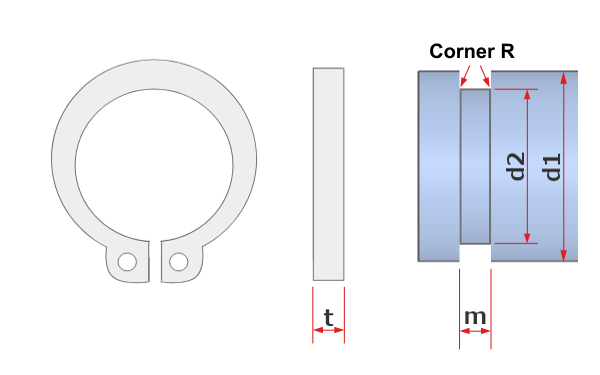
Retaining Rings / External / C-Type
Applicable axis
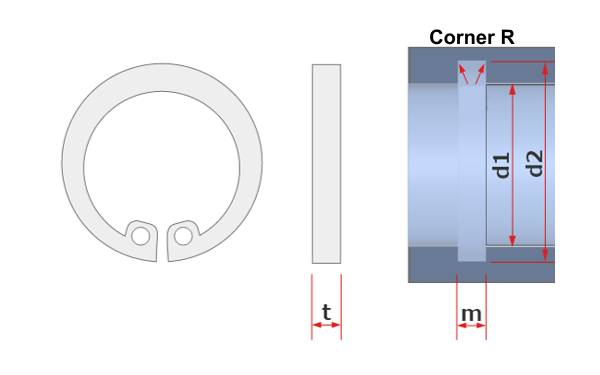
Retaining Rings / Internal / C-Type
Applicable grooving
| Reference values for C-Type retaining ring “t,” “m,” and “Corner R” | ||
|---|---|---|
| t: Retaining ring width | m: Required groove width | Corner R |
| 1 | 1.15 | R0.1 or less |
| 1.25 | 1.35 | |
| 1.5 | 1.65 | R0.15 or less |
| 1.75 | 1.9 | |
| 2 | 2.2 | R0.2 or less |
| 2.5 | 2.7 | |
| 3 | 3.2 | |
| 4 | 4.2 | |
Notes
- It is recommended that diameters d1 and d2 are designed to meet the standard for C-type retaining rings.
- *E-type rings for small diameters are not available
